Remember playing hopscotch as a kid? One foot up, a quick hop, and a burst of laughter when we toppled over. The funny thing is, we didn’t realize it then, but those moments were our first introductions to Bikram yoga. Fast forward to now, and say hello to the adult version of that game! The Toe Stand, or as we say in the yoga world, Padangustasana.
Practicing this pose is a journey in itself. You’ll find yourself stumbling and wobbling, which is completely normal. However, the key is to not get frustrated with yourself. With time and lots of grace, you’ll eventually master the pose and find the peaceful stillness that comes with it. The Toe Stand is a lesson in finding calmness in the chaos, both on and off the mat.
Sanskrit for Toe Stand
Sanskrit is an ancient Indo-European language used for thousands of years. Many yoga poses are also known by their Sanskrit names because of yoga’s historical roots in India. In Sanskrit, the Toe Stand is known as Padangustasana. The word comes from three Sanskrit words: “Pada,” meaning foot, “Angusta,” meaning big toe, and “Asana,” meaning posture. Basically, in a direct translation, Padangustasana means “Big Toe Pose Posture.”
In some yoga practices, Padangustasana is a different pose where you grab your toes and lean forward. However, in Bikram yoga, Toe Stand is a balance pose where you’re on your toes, squatting down, with one foot at your hip. In Sanskrit, you could call this pose “Padangustha Padma Utkatasana,” which adds in “Padma” for “lotus” and “Utkatasana” for “powerful pose.” But, we use Padangustasana for short.
Before diving in to the Toe Stand, here is what we will cover in this article:
A Word Of Caution
Before we get started practicing Toe Stand, please be mindful of your body. If you’ve had recent knee, ankle, or hip issues, you might want to sit this out. Remember, this pose requires a lot of balance, so it might not be the best idea if you’re dealing with headaches, trouble sleeping, low blood pressure, or feeling lightheaded or dizzy.
Most importantly, please don’t push your body more than it wants to go. All in all, yoga is about feeling good and in tune with your body, not straining or hurting it. If you’re in the pose and something doesn’t feel right, please come out of it. It’s your practice and body, so listen to what it tells you.
And as always, if you have any health concerns, it’s a good idea to chat with your doctor before trying new yoga poses. They can help you determine what’s safe and beneficial for your body.
Step-By-Step Instructions for Toe Stand
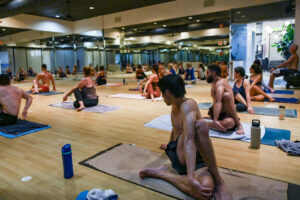
Toe Stand is a balancing pose, and the 12th pose out of 26 Bikram Yoga poses. Before we get started, remember that the Toe Stand is an advanced pose. So let’s take it slow and steady. It’s super important to listen to your body and adjust as needed.
Is this your first time practicing Toe Stand? Maybe your goal is to read through this guide and visualize yourself nailing the pose. That’s a great start. If you’re feeling adventurous, try it out on your mat with a lot of patience and self-love. But first, get your body moving. Wake up your muscles, or do some stretches. And remember – every yogi started at the beginning.
Finally, set an intention for your practice. Sometimes this can help keep our minds focused. Maybe you’re here to challenge yourself, or maybe you just want to feel more connected to your body. Whatever it is, hold it in your heart as you move through each step.
Getting Started
1. Find your starting point
Start by standing tall in mountain pose, hands open, resting at your sides.
2. Foot to hip
On a deep inhale, gently draw the top of your left foot up towards your right hip. Let your foot sit wherever it is comfortable, and hold it for a few breaths.
3. Gentle bend
On an exhale, gently bend your right knee. Find a resting place for your left foot on your right thigh.
4. Fingers to the floor
Now, allow your hips to softly lead the way as you bend your back towards the earth. Keep your left foot at your inner hip as you bend. Let your fingers touch the floor, and take a few nurturing breaths.
5. Lower yourself
Find balance in your fingers as you lower yourself to a squatting position. Notice your right heel slowly lifting off the ground.
6. Center yourself
Take a few calming breaths, and focus on finding stillness in your body. Check that your right heel is aligned under your body, not swaying to any one side.
7. Reach out, if needed
Another breath in. If your balance is feeling a bit wobbly, let your fingertips meet the floor.
8. Engage your core and find your balance
As you feel steadier, see if you can lift one or both hands off the floor. Remember to engage your core.
9. Stand tall again
Keep your fingers on the ground and your left foot at your hip as you slowly bring yourself to standing.
10. Heart connection
Bring your hands to your heart center once you’re standing. Take a few breaths here and ground yourself.
11. Time to let go
Gently return your left foot to the floor.
12. Repeat on your left side
Finally, repeat these steps on your other side – starting with your left leg as your base.
So, you’ve either read through the steps or maybe even practiced the Toe Stand – that’s awesome! No matter where you’re at, reading or doing, you’re moving forward, and that’s what counts. In general, this pose isn’t an easy one, so be patient with yourself.
Remember, it’s not about getting a pose right the first time or even the tenth time. It’s about showing up and learning. Whenever you read about a pose or try it out, you’re growing in your hot yoga practice.
Mind and Body Benefits of Toe Stand
Practicing the Toe Stand, or Padangustasana, is more than just a fun challenge – it can do wonders for both your body and mind. With practice, here are some benefits you might experience from practicing this pose:
- Strengthens your legs
- Improves your balance
- Boosts your focus
- Opens your hips
- Develops your sense of body awareness
- Teaches patience and calmness
Modifications for Toe Stand
If you’re feeling a bit tight: If your hips feel stiff, you can adjust your foot to rest on your calf or ankle rather than placing your foot at your hip. Find what feels right for your body.
Balance support: Balance can be tricky at times. If you’re feeling wobbly, try practicing near a wall. You can use it for a quick hand touch when you need that extra support.
Knee care: Consider using a yoga block or a folded towel under your standing foot if your knees are sensitive. This can provide the alignment your body needs to feel comfortable.
Ankle protection: If your ankle feels strained, ease off a bit. You can stay in a half-standing position, still benefiting from the pose but without straining your ankle.
Squat assistance: If a full squat feels too challenging, try using a yoga block. It can ease the strain while you’re working on increasing your flexibility.
If you’re feeling up for a challenge: If you’re feeling like you’ve got a firm handle on the pose and you’re ready for more, try not to let your hands touch the floor. It can be a fun way to test your balance!
FAQ
How am I going to handle the heat when I’m in such a challenging pose?
It’s okay to feel nervous about how the heat might affect your practice. Remember, yoga is all about listening to your body. If the heat becomes intense, it’s perfectly okay to modify the pose or rest in a comfortable position. All in all, the beauty of yoga is its flexibility – not just of body but also of practice. You’re always free to adapt it to what feels right for you at the moment.
What if the heat makes me feel exhausted too quickly?
Feeling exhausted can be a sign that you’re pushing your body, which is a natural part of growth. At the end of day, if the heat makes you feel too tired too quickly, listen to your body. Above all, hydrating is essential before a hot yoga class, so make sure you’re drinking enough water before you step into the studio. If you need a break at any point during the class, you’re always welcome to take one.
What if I’m the only one who needs to take a break?
This is your practice, and it’s all about what feels right for you. Remember, this is your practice, not a competition with the other people in the room. In the end, if you need to take a break, go ahead, and give yourself that permission to take one – we’ve all been there.